Friends as you all know about root.In this tricks i will about How to Root Android Phones [ Without PC as well as with PC ].So friends share this trick with your friends too and make him know about root.Just follow the steps given below and full description about root.

Working trick Root Android Phones Easily without PC and With PC
Advantages of Root :-
- Increase Ram without Pc
- Increase Battery Backup
- Customize your Android Phone
- Can change Android Id,Imei Number
- Mobile will not Hang.
Disadvantages of Root :-
- It will avoid your phone warranty.
- It will damage your phone.
Settings which you have to do :-
- Enable unknown sources in your device by ==> Navigation to “Security settings” on newer devices or “Application settings” for older devices
- Download the Root APK from the root apps list below
- Install the app and launch it from the home icon
- Select the appropriate options (Install SuperSU for Framaroot app) to completely root your device
- Install the root checker app to confirm your device is now rooted
Without PC Tricks :-
About KingRoot :- KingRoot is a root tool for "lazy people" who just want to get root access but don't want to flash any third party Recovery into their lovely device. It can work on almost all device from Android 2.x – 5.0. Working of KingRoot based on system exploit. The most suitable Root strategy will be deployed from cloud to your device according to your ROM information. So, it’s necessary to keep net connection during root process. What’s more, KingRoot(app) will not trip Samsung KNOX and have ability to close Sony_RIC perfectly. Meanwhile, unroot operation also can be done easily by just click the button in the menu of KingRoot. PURIFY is an optimized tool for your Android OS. She can help you to save battery power, improve device standby time, increase speed and return your device to it's pure state. PURIFY works only with ROOT access so if your device is not rooted, you must obtain it before using PURIFY. You can obtain ROOT access through KingRoot . First and foremost, the first thing we can do is extend standby time and save your battery power. Through purifying apps that insist on running in the background, we can save RAM for you and let your device run faster than ever! Moreover, for the applications that utilize larger than average amounts of RAM, these too can also run smoothly after purifying mode is implemented. PURIFY can also help you archive notifications and give you a clean notification bar.
How to install :-
- Install it and open it.
- After opening you will see root option.
- Click on it and after sometime your phone will be rooted
- Now reboot.
About Framaroot :- Now you can root your android device without PC, just use framaroot. This app including several exploits named as the heroes of the book "The Lord of the Rings" Gandalf, Boromir, Pippin, Legolas, Sam, Frodo, Aragorn and Gimli. You can install Superuser and su binary on phone or tablet from android version 2.x to 4.x. Unroot also very simple, just use this option in framaroot application.
How to install :-
1. Download Framaroot from our site
2. Run, choose Superuser or SuperSU
3. Select Boromir or another character
4. You will see :-)
5. Reboot device
6. Root- installed
1. Download Framaroot from our site
2. Run, choose Superuser or SuperSU
3. Select Boromir or another character
4. You will see :-)
5. Reboot device
6. Root- installed
About iRoot :- iRoot apps are designed by iRoot team, which provide the service of rooting for almost all Android devices with different Android versions. Considering about the advantages of rooting, more and more Android users need to get their devices rooted. With iRoot software, you will never run the risk of bricking your device due to it's highest success rate.By accessing our website and using the root apps, you agree with following and be bound by the Privacy Policy which has been posted on our website.If you have any problems, please contact us via support@iroot.com.
About Kingo Android Root :- With the booming of the mobile Internet, we gain and access information not only from the traditional desktop environment, gradually moving toward a more freely environment. In 2011, Kingo R&D Team made a clear products development strategy and concentrate into Android operating system research and development, and adhering to the philosophy of kingosoft , we committed to create and test stable and easy to use ROMs and the best Android Root Manager APP, to achieve the best user experience. Kingo formal enabled Kingoapp.com domain name as the smartphone vertical portal, so Android users can obtain depth technical information and resources.
With PC :-
First of all Enable USB Debugging Mode on Android :-
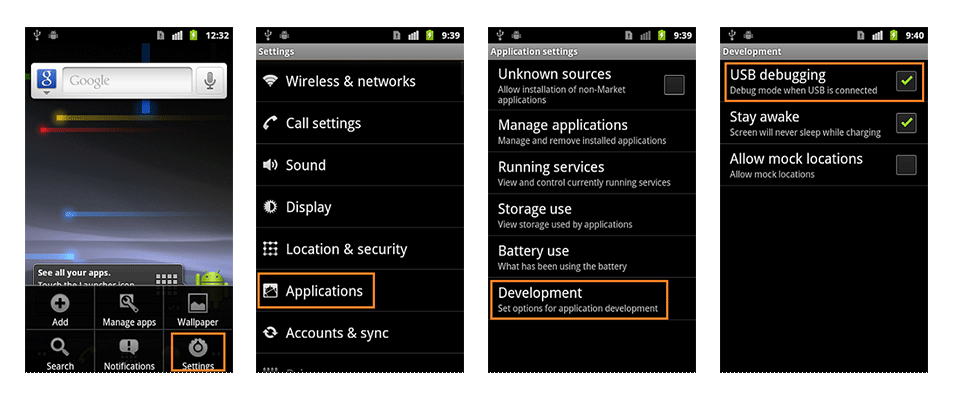
1. Android 2.0-2.3.x
Settings > Applications > Development > USB Debugging.
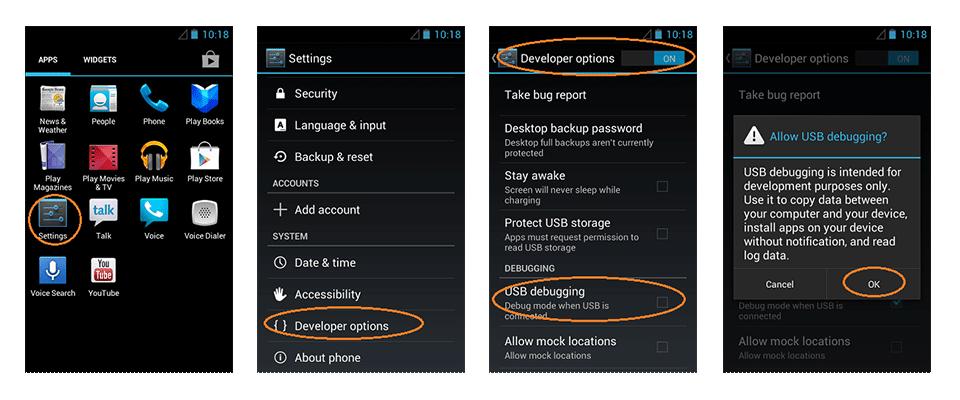
2. Android 3.0- 4.1.x
Settings > Developer Options > USB Debugging.
3. Android 4.2.x and higher.
In Android 4.2 and higher versions, the Developer Options menu and USB Debugging option have been hidden. In former 4.X versions of Android, USB Debugging option is under Developer Options menu.
First, you need to enable "Developer Options Menu".
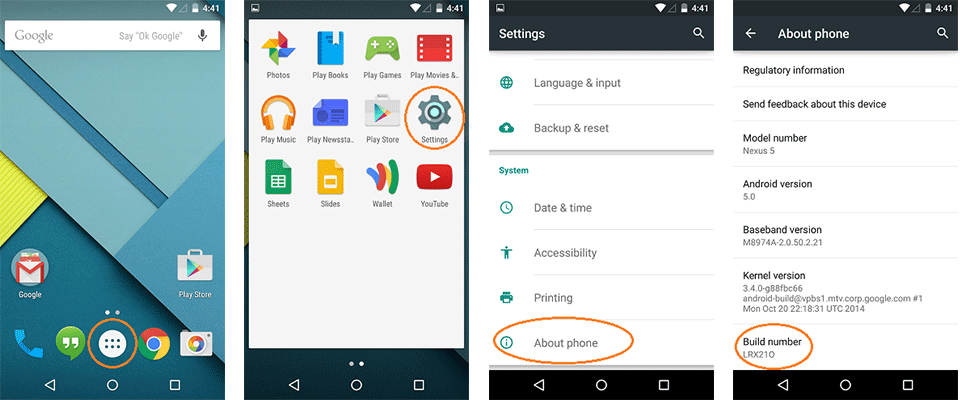
- Click Menu button to enter into App drawer.
- Go to "Settings".
- Scroll down to the bottom and tap "About phone" or "About tablet",
- Scroll down to the bottom of the "About phone" and locate the "Build Number" field.
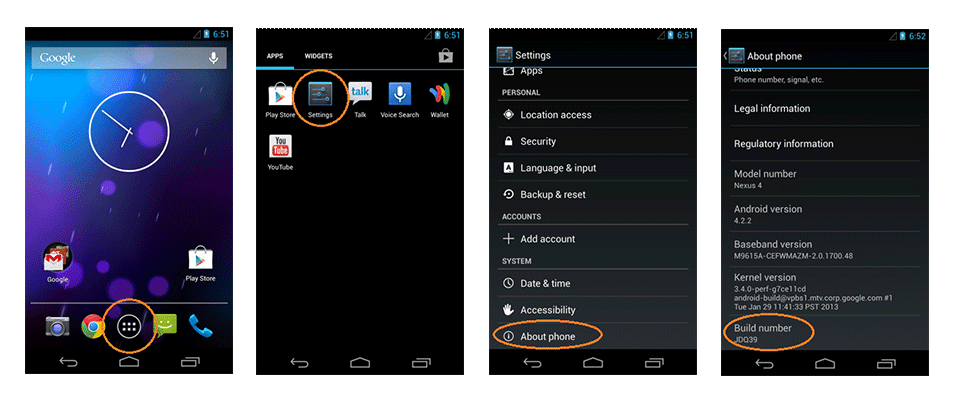
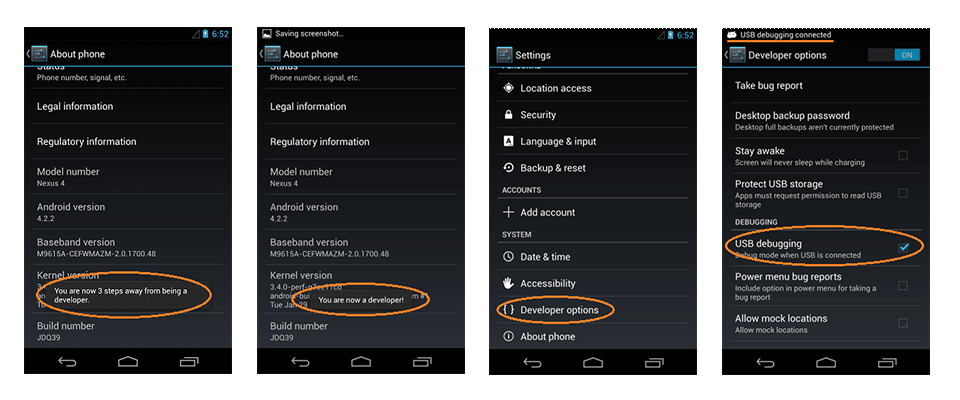
- Tap the Build number field seven times to enable Developer Options. Tap a few times and you'll see a countdown that reads "You are now 3 steps away from being a developer."
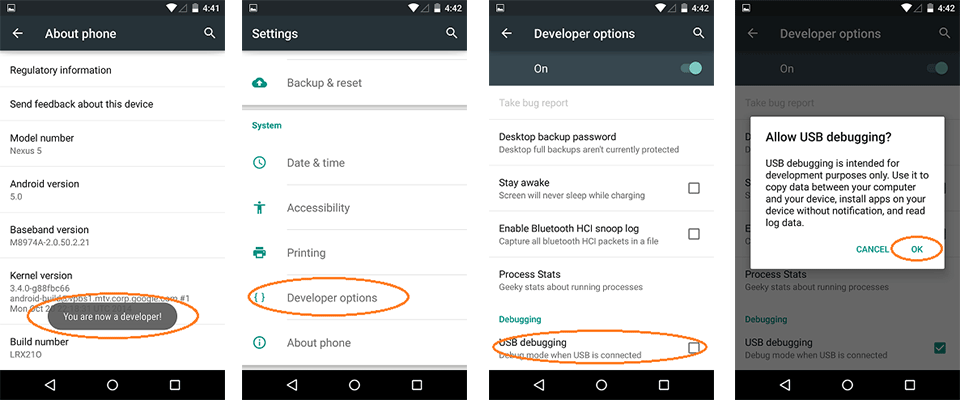
- When you are done, you'll see the message "You are now a developer!".
- Tap the Back button and you'll see the Developer options menu under System on your Settings screen.
Now, you can enable USB Debugging mode.
- Go to Settings>Developer Options>USB Debugging. Tap the USB Debugging checkbox.
4. Android 5.0 Lollipop
To enable USB Debugging on Android 5.0 Lollipop is the same as Android 4.2.x.
- Settings > About Phone > Build number > Tap it 7 times to become developer;
- Settings > Developer Options > USB Debugging.
Warning :- USB Debugging should only be enabled when you need it. Leaving it enabled all the time is kind of a security risk for that this mode grants you high-level access to your device. Say if you connect your Android phone to a USB charging port in a public location, the port could use the USB access to your phone to access data on your phone or install malware. This could happen when and only when USB debugging mode is enabled.To disable USB Debugging and other developer options when you don't need them, slide the switch at the top of the screen to OFF.
- iROOT :- Download it From Here.
- KingRoot :- Download it From Here.
- KingoRoot :- Download it from Here.
Visit daily and we will give every tricks that u want.Get latest tricks on our facebook group also.
- My Facebook Group :- https://www.facebook.com/groups/aktricks4u


0 comments:
Post a Comment